Salesforce Opportunities App group_work
The XTIVIA Salesforce Opportunities app connects with Salesforce Sales Cloud using a configured Salesforce account, and exposes Opportunity records from Salesforce in Jahia-based views. Note that Opportunity is a standard object in Salesforce that represents a potential sales deal, and it typically contains details about the potential deal, like account, deal description, expected deal size, expected close date, probability, and opportunity stage.
The XTIVIA Salesforce Opportunities module provides two views into the health of your sales pipeline - a dashboard view with key sales pipeline metrics and a list view that provides more details.
For more details about the modules's features read our blog Introducing XTIVIA Jahia Salesforce Opportunities App
Dependencies & Dependants
How To Install
Follow these steps to get the Salesforce Opportunities App up and running on your Jahia instance:Configuration
Configuration can be done at two levels; site level and module level. Most configuration will occur at the site level. This configuration acts as a global configuration which is also used by downstream Salesforce application modules placed on pages within your Site. Lower level modules can override the site level configuration by supplying a different configuration on a per module basis. Setup configuration properties at the site level by right clicking the site name and choosing Edit-->option. See Figure 2 below for an screenshot of what that looks like.

Figure 2 - Salesforce Opportunities Site Configuration
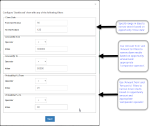
If a particular module needs to override connection properties defined at the site level, then those can be provided at the module level (module properties). See Figure 3 below for an screenshot of what that looks like.

Figure 3 - Salesforce Opportunities Module Configuration
The Salesforce Opportunities app can be configured (by admin user while configuring the module) by to show opportunity data in two views.
Please note that admin user can combine these two views on the same page by dropping two instances of this module on a page and selecting ‘Dashboard’ view for one instance and ‘List’ view for the other instance.
- Download and install the Salesforce Opportunities App from the Jahia Public Store.
- Create your Salesforce Connected App on Salesforce by following the instructions here. This step is required to connect to Salesforce.
- Do the module configuration at the site and/or lower level site module.
Configuration
Configuration can be done at two levels; site level and module level. Most configuration will occur at the site level. This configuration acts as a global configuration which is also used by downstream Salesforce application modules placed on pages within your Site. Lower level modules can override the site level configuration by supplying a different configuration on a per module basis. Setup configuration properties at the site level by right clicking the site name and choosing Edit-->option. See Figure 2 below for an screenshot of what that looks like.Figure 2 - Salesforce Opportunities Site Configuration
If a particular module needs to override connection properties defined at the site level, then those can be provided at the module level (module properties). See Figure 3 below for an screenshot of what that looks like.
Figure 3 - Salesforce Opportunities Module Configuration
The Salesforce Opportunities app can be configured (by admin user while configuring the module) by to show opportunity data in two views.
- Dashboard View
- List View
If you select 'Dashboard' view
1. Make sure you check 'check boxes' for filter properties 'Close date', 'Probability From', 'Probability To', 'Account From', 'Account To'
2. Optionally provide values for filter properties 'Close date', 'Probability From', 'Probability To', 'Account From', 'Account To'
3. Users can personalize the 'Dashboard' view by changing filter values in 'Live' mode.
Please note that admin user can combine these two views on the same page by dropping two instances of this module on a page and selecting ‘Dashboard’ view for one instance and ‘List’ view for the other instance.


